Vocaster Two: Twice the features, twice the price

It’s only fairly recently that I’ve delved into the world of recording podcasts with multiple in-person participants1, but that’s what finally opened the door for me to switch from a USB microphone to a dedicated audio interface.
Having since passed over that threshold, I was intrigued to see the announcement a few months back of the Focusrite Vocaster Two. Focusrite is well known in podcast circles for its generally well-regarded line of Scarlett audio interfaces, though they tend to be aimed at a more traditional audience.
But the Vocaster Two (and its companion, the single XLR input Vocaster One) are designed from the ground up to provide a one-stop shop for podcasters, capitalizing on the explosive growth of that market in recent years.
Now, before going further, I have to be clear: most podcasters don’t need everything the Vocaster Two provides. Often times the bells and whistles that get added to products like this are purely superfluous; in the case of the Vocaster, I actually think that the power provided is impressive, though in most cases it will outstrip the average podcast host’s needs. But if you want true versatility in your podcast production, the Vocaster does have a ton of features, and mostly delivers them in a well-designed, easy-to-use package.
That power and convenience comes at a very literal cost: at a list price of $299, the Vocaster Two is among the more expensive two-input audio interfaces on the market, much more expensive than the EVO 4 that I’d been using prior.
But it’s also pretty nice.
Make sure you’re connected
Like most USB-based audio interfaces, setting up the Vocaster Two is pretty straightforward: plug in the included USB cable (the Vocaster uses USB-C, which is a plus, but cops out a bit by including only a USB-C-to-USB-A cable in the box—though that is understandable given USB-A’s remaining ubiquity), and you’re pretty much up and running.
Focusrite offers its own software, Vocaster Hub, but you don’t strictly speaking need to install it for general use; macOS’s built-in audio system will recognize the interface just fine. However, the app does provide access to a few features that you can’t otherwise use (more on which in a bit).

The Vocaster also works with an iPad with a USB-C port, which works surprisingly well, though you’ll need an app capable of multitrack recording to get the most out of it.
While I’m not a stickler for audio quality, the Vocaster’s recordings sounded solid to me. I utilized both of its XLR inputs, one with a Shure MV7 and the other with a Pyle PDMIC58. The only odd audio issue I noticed is something about the way the MV7’s monitor sounded to my ears when connected to the XLR interface—but I noticed the same issue with the EVO 4, so it seems like that’s an issue with the mic rather than the interface. But that was more of a personal preference issue than anything that impeded the utility.
I’ll also note that the Vocaster Two essentially “takes over” your Mac’s audio output: output volume via the OS is disabled and the volume keys on your keyboard, for example, won’t work. The same goes for input level. That’s dissimilar from the way that the EVO 4 works, where adjusting the gain or volume on the hardware unit also confusingly adjusts the system level. I prefer the Vocaster Two’s approach, which also meant I spent less time fiddling with levels in multiple places.
Do change that channel
When I first set up the Vocaster Two, I didn’t do any tweaking: just set it as my input and output, and chose what I thought were the correct channels for my main mic in Audio Hijack.
It wasn’t until several days later that I realized something weird was happening. When I started recording in Audio Hijack while on a Zoom call, my remote co-hosts often noted that they could hear themselves for a moment. While I was on one show, I moused over a video on Twitter2 and realized belatedly that the audio from my computer was being piped to everyone else.
Whoops.
After looking closer at the documentation for the Vocaster Two, I realized what the issue was: the Vocaster Two actually offers an astounding 14 channels of input. The default is a mix-minus option which includes Loopback inputs from your computer—not what I’d been looking for.
Using that channel breakdown, I was able to isolate just the inputs for the two local mics and specify those in Audio Hijack (channels 5 and 6, as it turned out). I also created a virtual audio interface in Rogue Amoeba’s Loopback software to let me specify just the mic inputs, but you can also accomplish something similar with Apple’s Audio MIDI Setup app; Focusrite helpfully provides instructions about how to configure that, though you may have to read between the lines in terms of getting it set up just the way you like it.

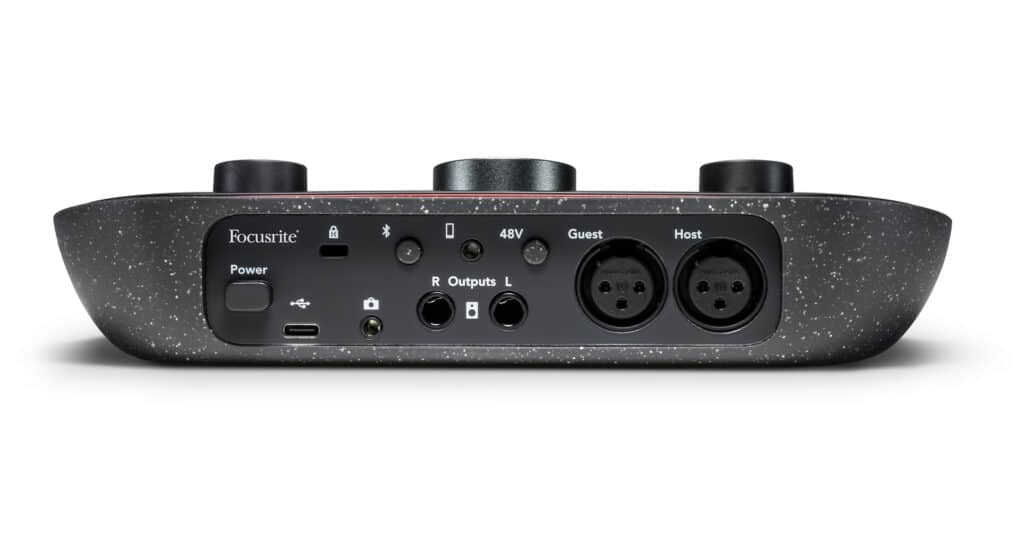
Those channels also include a 3.5mm jack to bring in a phone (complete with a mix-minus that feeds back to the person on the phone), outputs for stereo speakers, an output to a video camera, and even Bluetooth for pairing a phone. Most of those are features I don’t need, but they do contribute to the unit’s versatility.
One thing that this did spur me towards was chasing down whether this panoply of inputs, particularly the Bluetooth, would let me achieve that holy grail of recording a podcast entirely on my iPad. The answer is a qualified yes: if you have an iPad with a USB-C or Thunderbolt port, you can plug in the Vocaster Two and use it to record not only your own mic, but also remote participants in some VoIP apps; I was able to get it to work in Zoom using one of the interface’s Loopback channels. But it still feels like a bunch of hoops to jump through for something that should be easier to do on an iPad itself with no additional hardware. Given all the equipment you’d have to haul around with you just to make this work, you’re still better off with a Mac for now—functional though it was, this was more of a novelty.
Design is how it works
Perhaps my favorite aspect of the Vocaster Two, the one that really sold me on it as an audio interface, is its design. That starts from the most basic level: Most audio interfaces keep their controls on the front, as if they expect to be rack mounted in a professional studio. But if you’re sitting at a desk and your interface is in front of you, front-mounted controls aren’t the most convenient or visible.
Instead, the Vocaster opts for a flat design with the controls on top and at a slight angle. Not only does it make it easy to see the meters at a glance, but adjusting the volume or gain knobs is a snap. I also appreciate that those controls are large and easy to access; you won’t accidentally hit the wrong knob. More to the point, in an advantage over the EVO 4, there are both two 1/4-inch headphone outputs and two volume control knobs, rather than one sharing double duty.
The Vocaster Two does, however, often a single gain knob for adjusting both XLR inputs; you have to toggle which one you want to control with buttons at the bottom. That said, there are always-active discrete gain meters for each input, which obviates some of the downside of sharing a single control, and you shouldn’t have to adjust the gain too much once you have it set to your liking. There are also independent controls for muting each input, which is a big feature lacked by many other two-input interfaces. All the controls are also backlit; hit the mute button and it turns red (and the gain meter for that input pulses red—basically you can’t miss it).

I also appreciated that the Vocaster Two has a power switch on the back; it’s a little thing, but I like to turn my interface off at night so it doesn’t just have light blaring around my darkened office.
If there’s a button on the interface that I’d ditch it’s the Enhance toggle. This activates an audio processing preset, which you have to specify using the Vocaster Hub software on your Mac: you can choose between Clean, Warm, Bright, and Radio. I can understand if you’re putting out a live show that tweaking the sound of your audio can be desirable, and that it might be tempting for some beginners who just want a button to make themselves sound a particular way. For me, though, it’s just wasted space on the interface, as I prefer to make these kinds of changes in post-processing.
And if there’s one feature that’s missing from the Vocaster Two, it’s a hardware option to adjust the mix between my monitor audio (i.e. hearing myself through my headphones) and the audio I’m hearing from my computer. That is adjustable—admittedly in a fine-grain fashion, along with levels for all the various channels—in the Vocaster Hub software, but that’s hardly convenient for a quick adjustment. Fortunately, the balance seems pretty good by default, and I’ve largely been able to leave it as is.
Vocaster Hub does provide one handy feature: an auto-gain option that will set your input to the correct level after hearing you speak into it for a few moments. The results on that were pretty solid, and it can take the guesswork out of adjusting the levels on your own.
Conclusion
Stacked up next to the EVO 4, my previous two-input interface, the Vocaster Two is far more capable and features a nicer, friendlier design; it’s really no contest.
The main question, then, becomes one of price. At $130, the EVO 4 is less than half the price of the Vocaster’s $299 retail price. Heck, the Vocaster Two is also $100 more than Focusrite’s popular Scarlett 2i2 interface. But the Vocaster Two’s podcasting-aimed features—mute buttons, inputs for Bluetooth or a phone, separate volume knobs and headphone jacks, and the top-down design—do definitely make it more appealing to anybody doing multi-person in-person podcast recordings.
Add in the impressive amount of channels in the Vocaster Two, and its ability to provide loopback audio to the iPad, and this device truly offers a lot more power than some competitors: it’s more like a studio in a box than just an interface.
Whether or not you need that power, though, is another matter. For me, the versatility and user-friendly design was enough to make a compelling argument—enough so that even before I’d finished writing this review, I went out and bought my own.3 I certainly don’t think everybody who wants to start a podcast needs the Vocaster Two, but if you’re looking for a nice upgrade, it offers a lot for its price.
- You can hear the result on A Complicated Profession, the Star Wars TV show recap podcast that I do with my friend Tony Sindelar and my wife Kat over at The Incomparable. ↩
- I admit it: sometimes I multitask. Shhh. ↩
- Granted, it was on sale at the time! ↩


