
Backup all of your important pics and vids with these services
Make sure you always have a backup of your important photos and videos with these cloud backup options.
For a lot of folks, the camera they use the most is the one they have with them all the time: their iPhone! With hundreds, if not thousands, of precious photos shot and stored in digital form on our devices, it’s super important to remember to back them up. That way, if you were to lose or break your phone, you have a copy of your photos somewhere else.
Here is how to set up iPhone photo backups with five of the most popular services.
iCloud Photo Library
Apple has a built-in photo backup service available for all iCloud users, which is appropriately called iCloud Photo Library. For many people, the integrated option is the best iPhone photo backup solution but to make the most of iCloud Photo Library you’ll want to make sure that you’ve upgraded to a paid iCloud+ plan. That’s because the paltry 5GB that Apple gives for free definitely is not enough, especially if you like using iCloud backups for the rest of the contents of your iPhone or iPad.
For iCloud+ plans, Apple provides three options: 50GB for $0.99 a month, 200GB for $2.99 a month, and 2TB for $9.99 a month. You also get iCloud storage as part of the Apple One bundles, which may be a better value if you use any of Apple’s other services.
If you have an iCloud+ plan with enough storage to backup your photos, here’s how to use iCloud Photo Library.
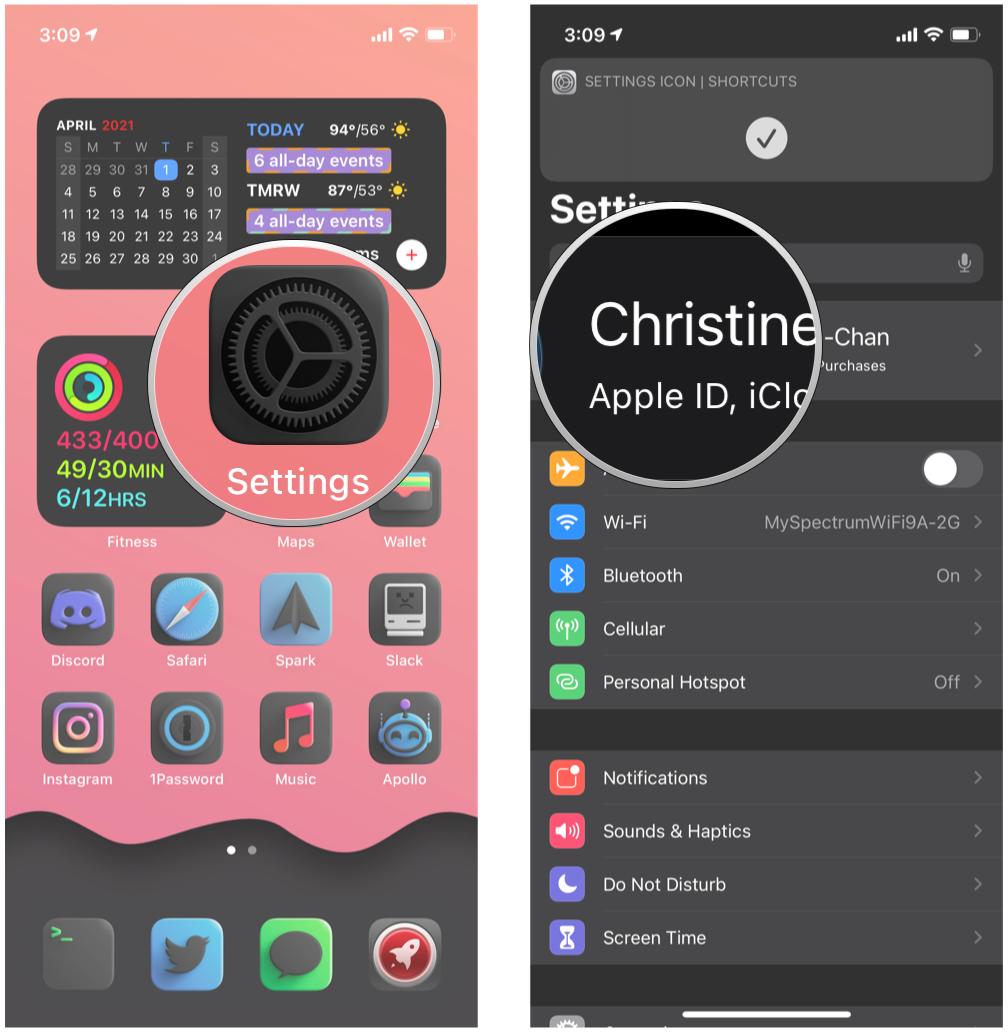
- Launch Settings on your iPhone or iPad.
-
Tap your Apple ID banner at the top.

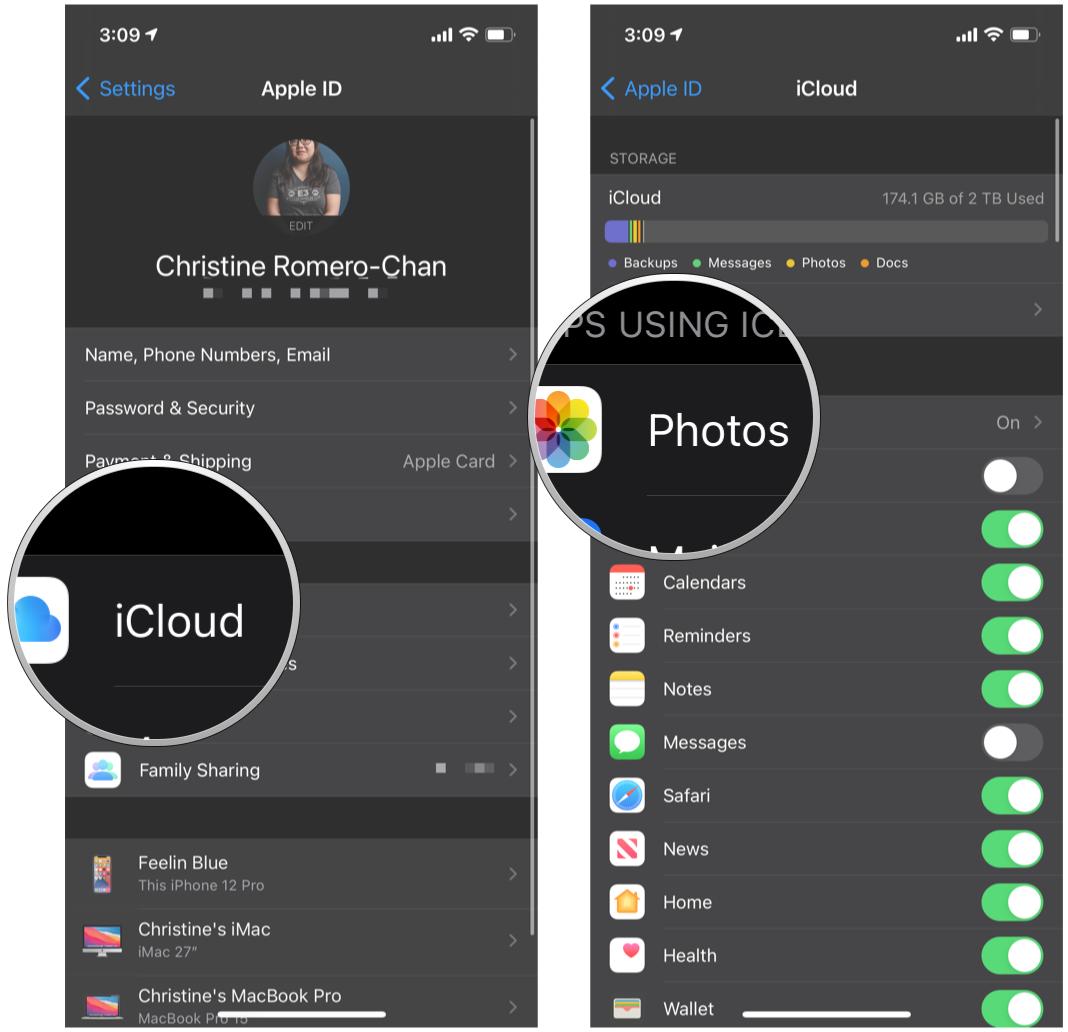
- Tap iCloud.
-
Tap Photos.
- Turn the toggle for iCloud Photos to ON.
-
Optionally, you can turn the toggle for My Photo Stream to ON as well.
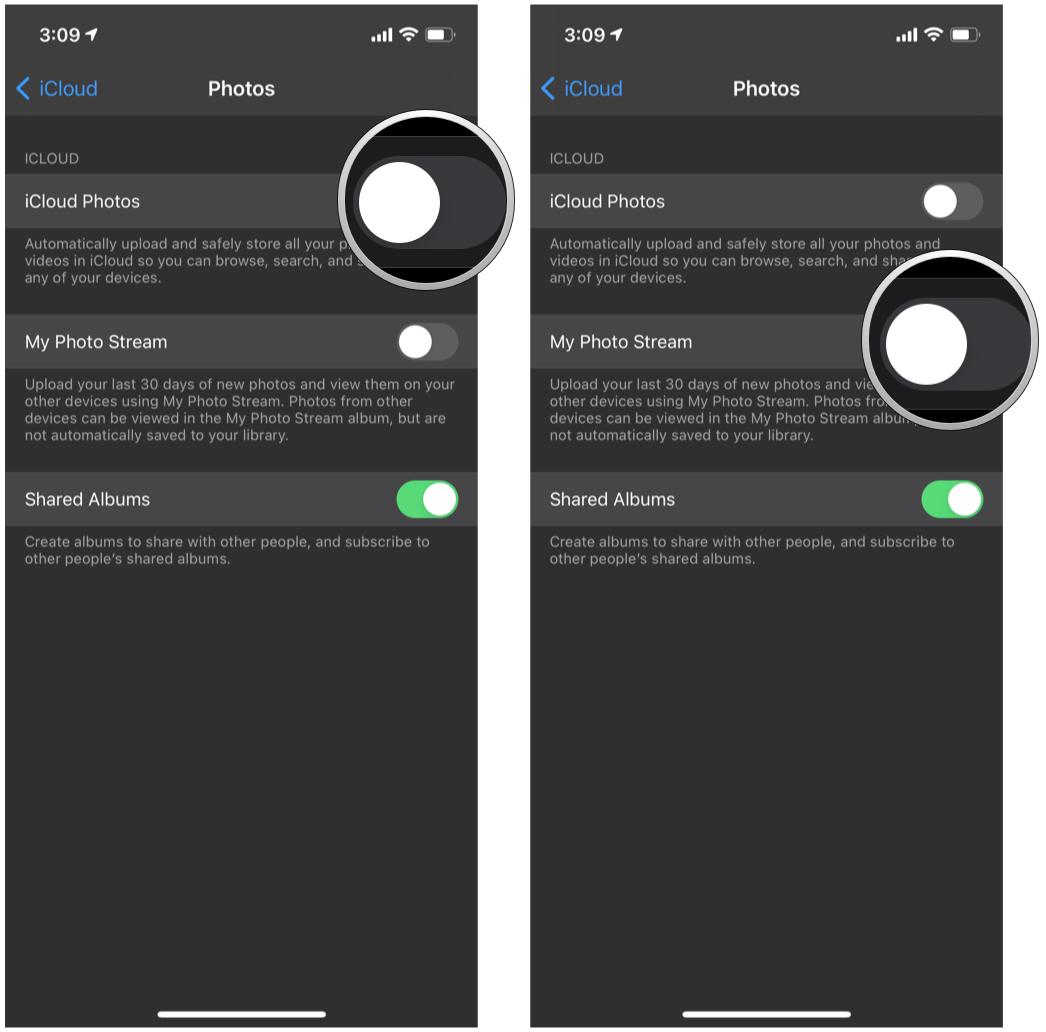
The difference between iCloud Photo Library and My Photo Stream is a big one. iCloud Photo Library automatically uploads and stores all photos and videos into iCloud, so you can browse, search, and share from any device that is logged in with that Apple ID. However, Photo Stream just uploads the last 30 days of new photos and videos so you can view them on other devices, but they are not automatically saved to your library — you’ll need to download them manually if you want to save them on another device.
Once you have turned on iCloud Photo Library or even My Photo Stream, it may take a while to upload everything. And whenever you have a new photo or video from that point forward, it should be uploaded automatically.
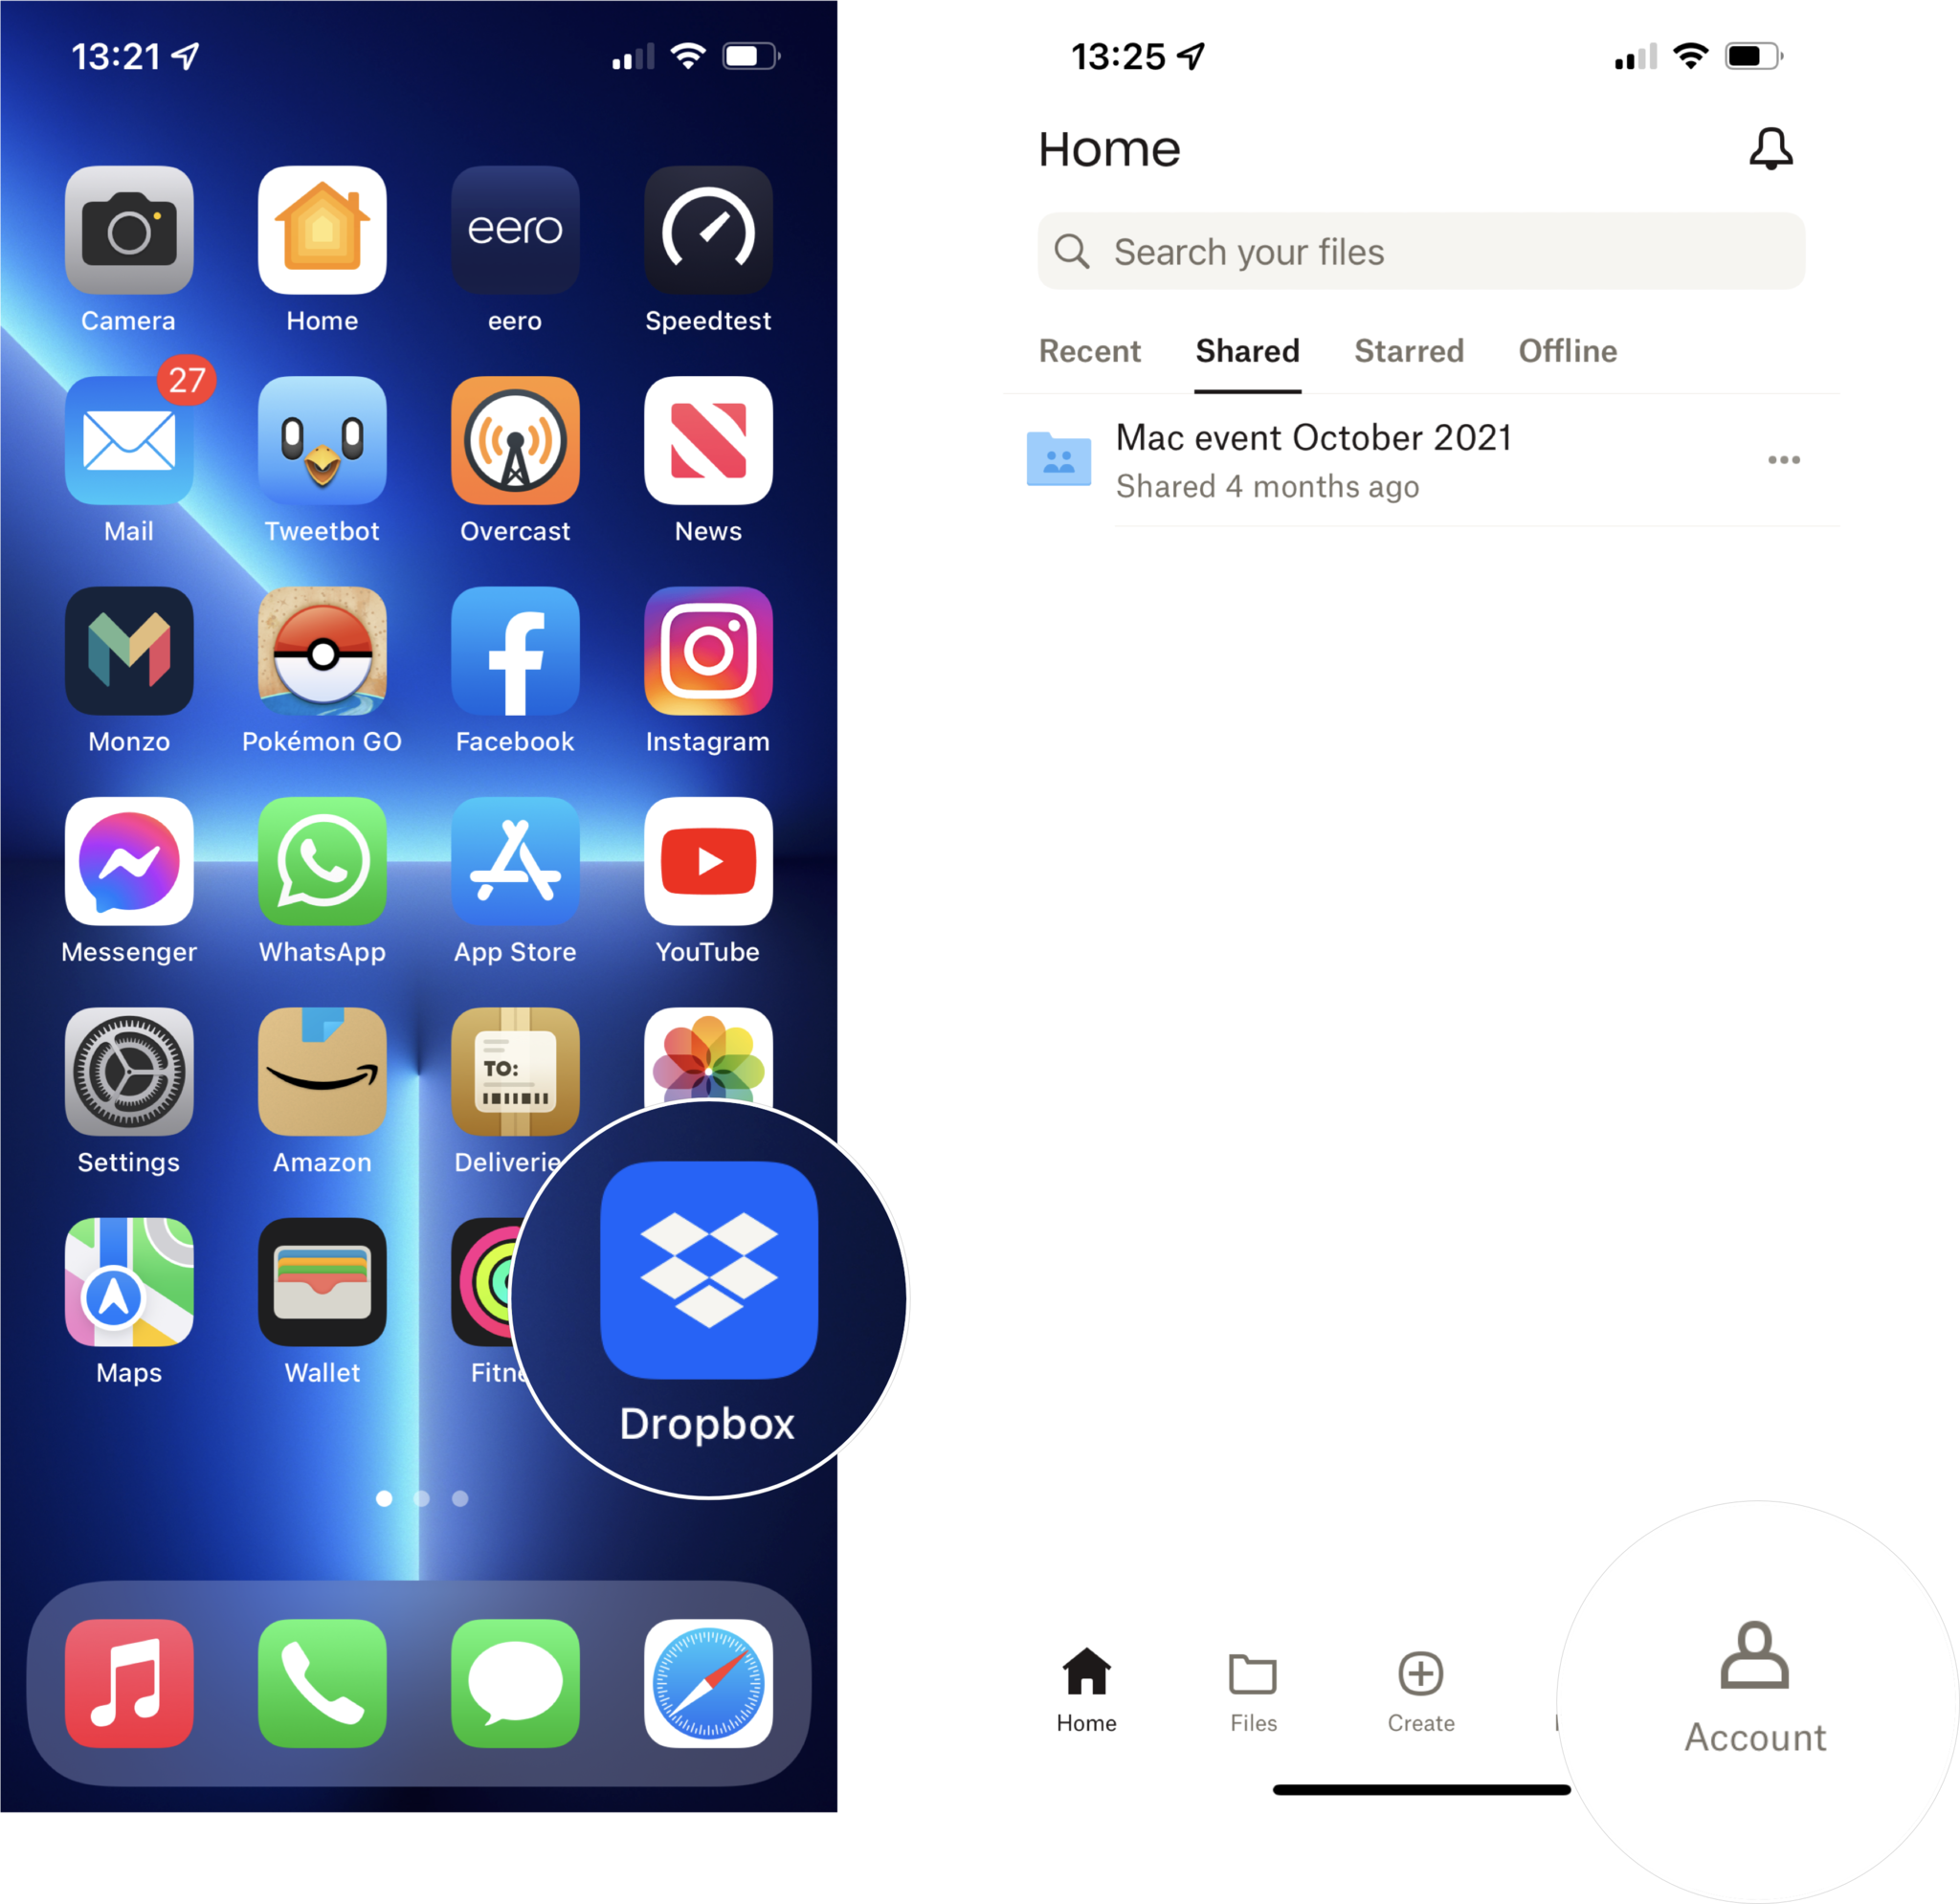
Dropbox
Dropbox is one of the better-known cloud services that has become ubiquitous with “cloud storage.” In fact, it’s what I’ve been using for years on all of my computers, phones, and tablets. And Dropbox makes it easy to automatically upload your smartphone’s photos and videos to the cloud, as long as you have enough space.
Plans for Dropbox start at $11.99 a month (or less if you pay annually) for 2TB of space and they go up from there. You can view all of their pricing information on the Dropbox website. A free account only gets you 2GB of storage, so it’s well worth looking into a paid Dropbox plan if you want to use it for all of your photos.
- Launch the Dropbox app.
- Log in with your account information.
-
Tap Account in the bottom toolbar.
- Tap Camera Uploads.
- Here you’ll see various settings for what type of content to back up and when, so choose what’s right for your needs.
-
Tap Turn on camera uploads.

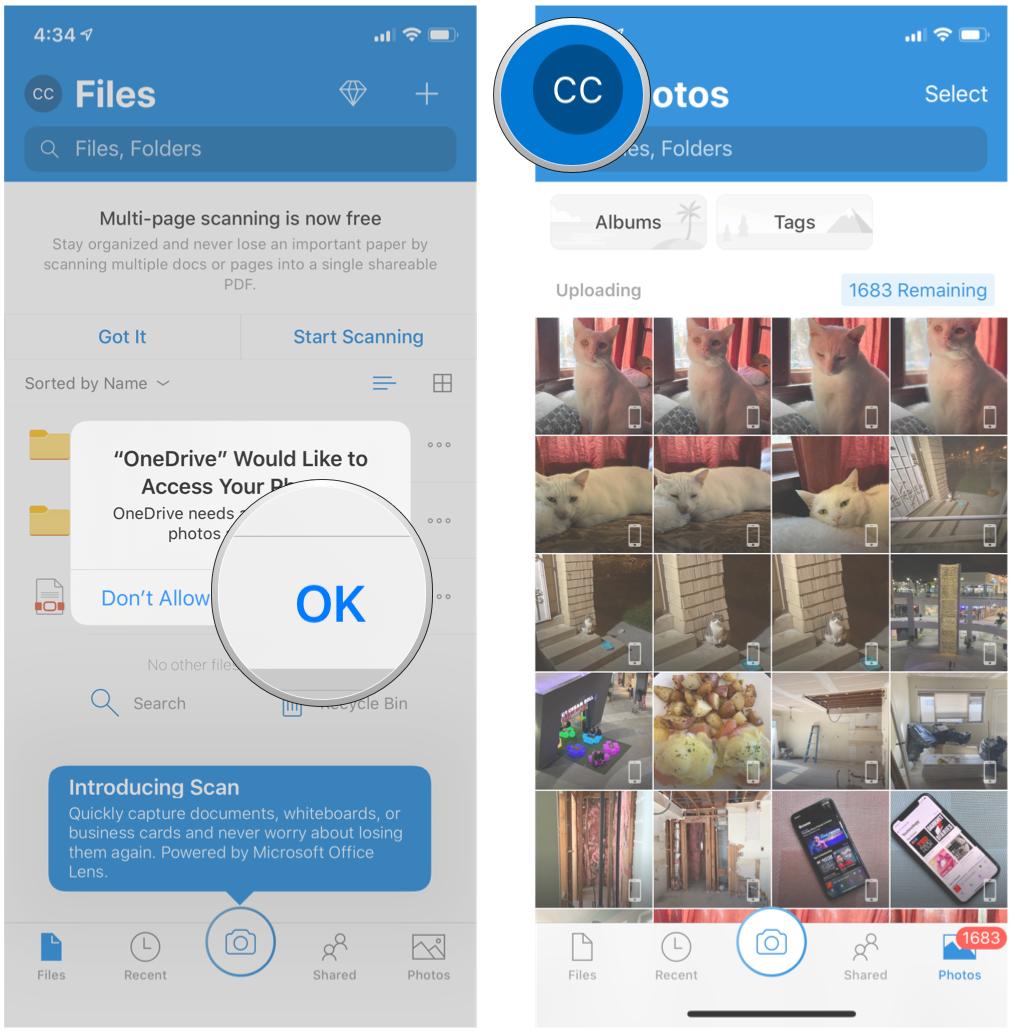
Note: If you haven’t already, you’ll be prompted to grant Dropbox permission to access your Photo Library in order to perform photo backups.
Once you turn on Photo Backup for Dropbox, it will automatically upload all of your photos and videos to your Dropbox account when you launch the app and go to the Photos section.
Amazon Photos
Amazon may be great to get your online shopping done, but did you know that you can store your photos and videos there as well? Thanks to the free Amazon Photos app, you can get unlimited full-resolution photo storage with your Amazon Prime membership or pay as little as $2 per month if you don’t have Prime.
- Launch the Amazon Photos app.
- Login with your Amazon account credentials.
-
Tap the smile icon at the top left of the screen.
- Tap the cog icon to view your account settings.
- Under Account settings, tap Upload settings.
-
Under Auto-save, toggle Save photos and/or Save videos to ON and choose whether you want this to work over cellular data.

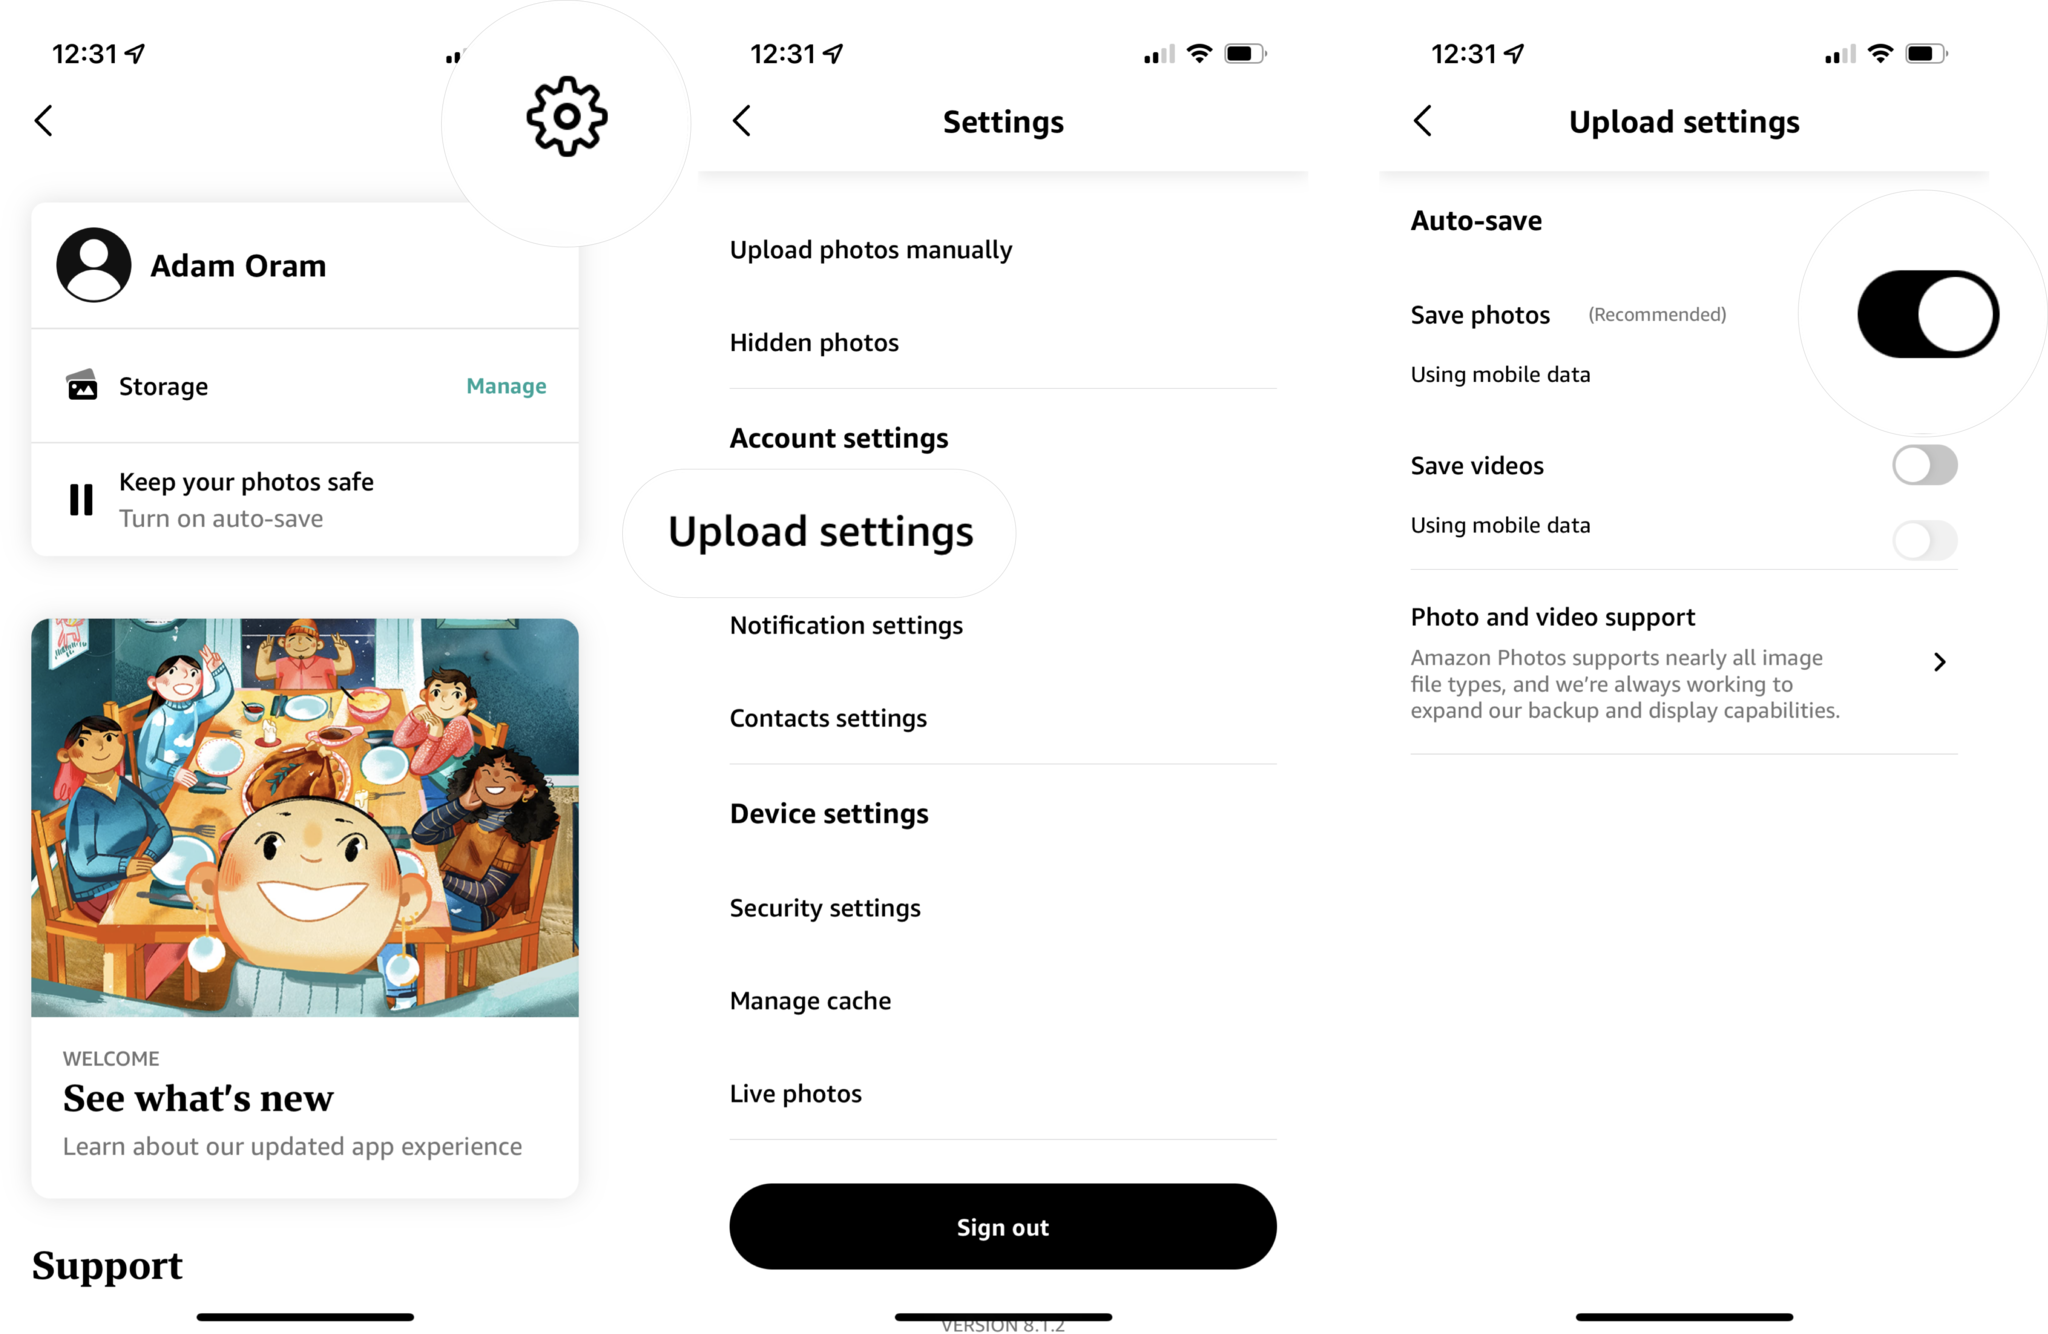
Note: If you haven’t already, you’ll be prompted to grant Amazon Photos permission to access your Photo Library in order to perform photo backups.
Your photos and videos should now begin uploading to the Amazon Photos app and any new media captured will be added automatically going forward.
Google Photos
Google is another great option to consider for your photo and video backups. You are already likely to have a YouTube, Google, or Gmail account, so you just need to log in with that and start uploading. Google gives you 15GB of storage for free and you can opt to pay for more storage if you need it.
- Launch the Google Photos app on your smartphone.
- Select the Google Account that you want to use if you’re already logged in, or just log in with your credentials.
- Tap Back up as Your Name.
- Choose whether you want Storage saver (compressed) uploads or Original quality.
- Tap the toggle for Use cellular data when there’s no Wi-Fi to ON if you want.
-
Tap Confirm.
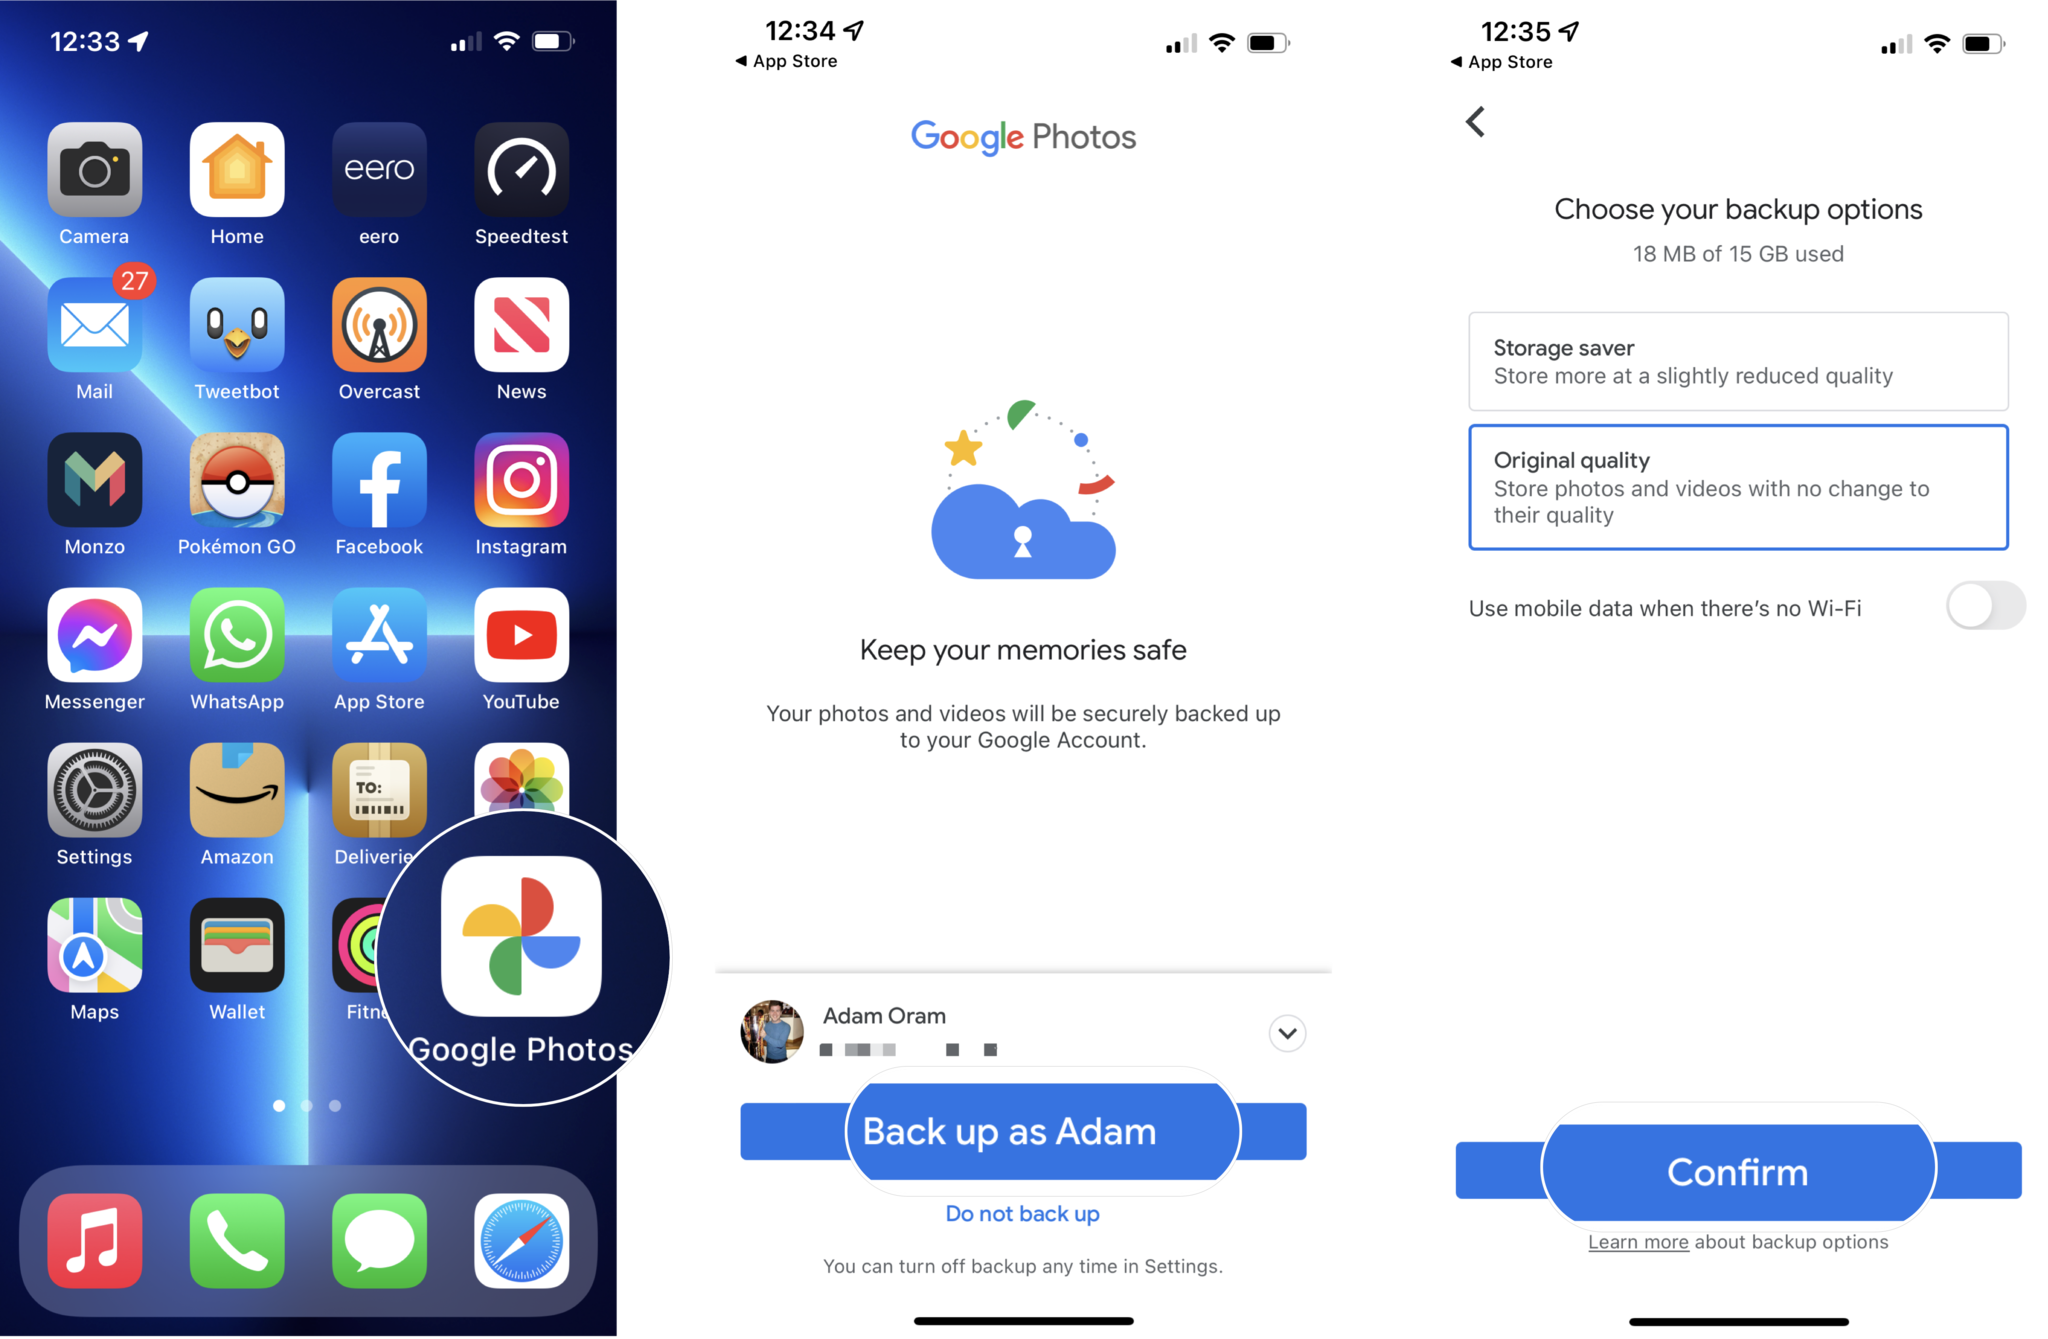
Note: If you haven’t already, you’ll be prompted to grant Google Photos permission to access your Photo Library in order to perform photo backups.
Your photos should then begin uploading to your Google account.
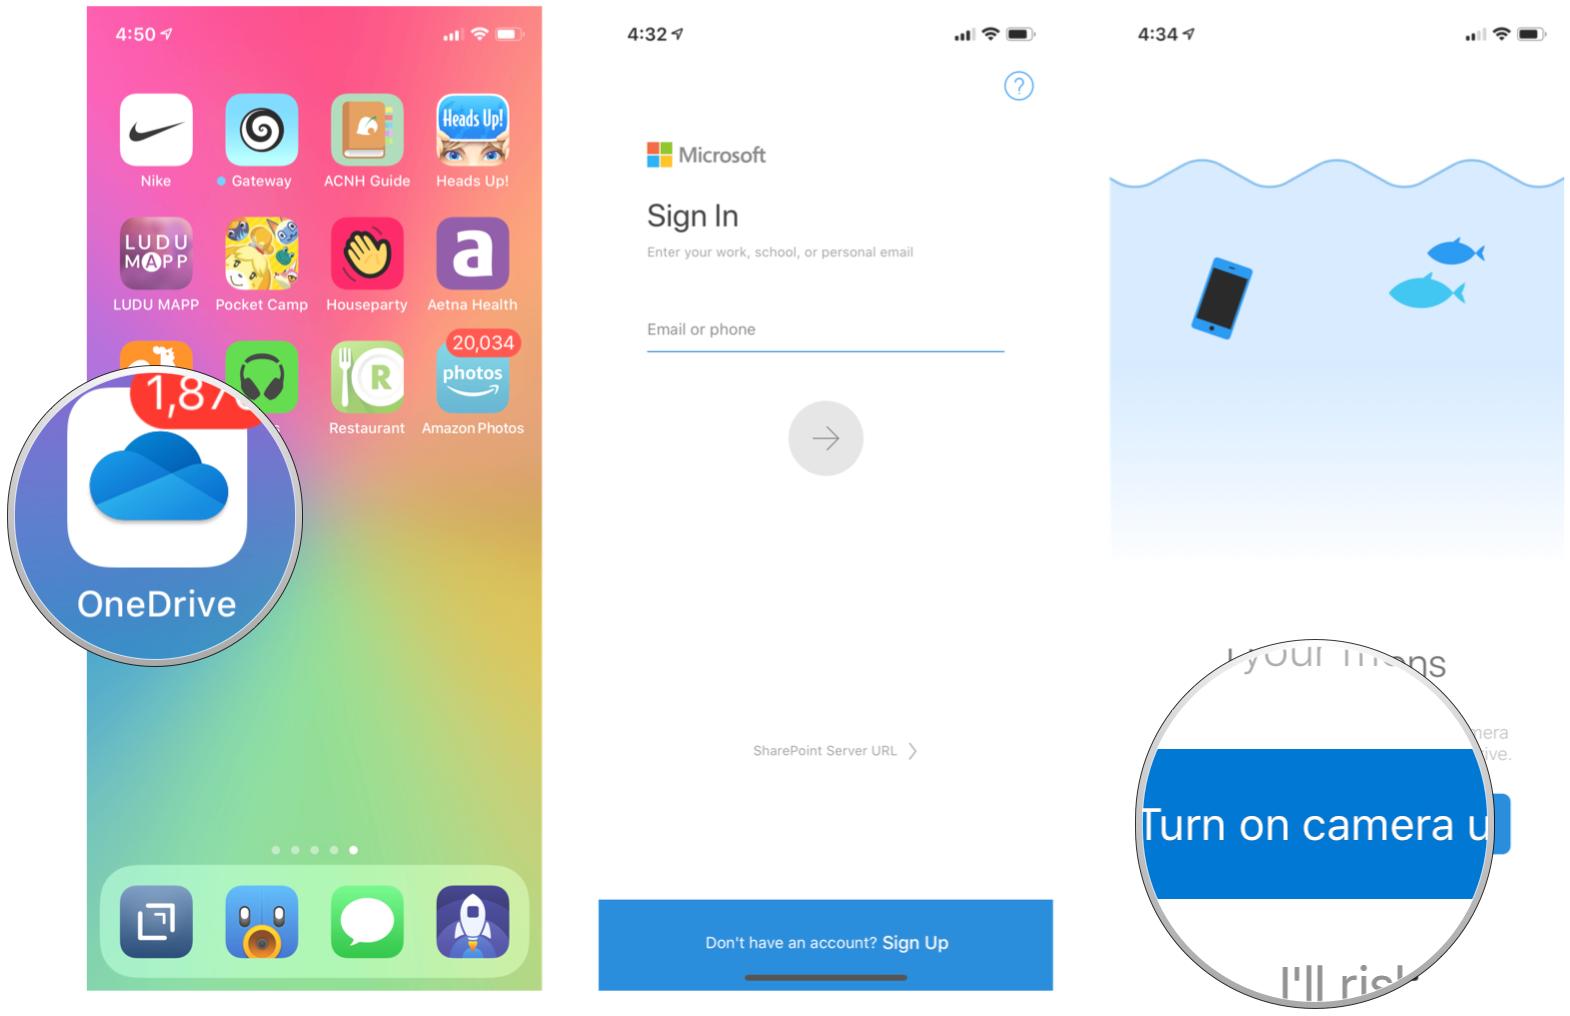
Microsoft OneDrive
If you’re looking for a cloud storage solution for your photos and videos that also is one of the best values for your dollar, then Microsoft OneDrive is it. We picked this one as offering the best value cloud storage because you get 1TB for $7 a month, and it also has an Office 365 subscription thrown in for good measure. Or you can get OneDrive alone for just $2 per month.
Here’s how to get it set up to automatically back up your photos and videos.
- Launch the OneDrive app on your smartphone.
- Sign in with your Microsoft account credentials or tap Sign Up if you don’t have one.
-
Tap Turn on camera upload when the app asks if you want to turn this feature on.
- Grant permission for OneDrive to access your Photo Library.
- Your photos will begin to upload to OneDrive.
-
Tap your account in the upper left corner.
- Tap Settings.
- Tap Camera Upload.
- Turn the toggle for Use Mobile Network to ON if you want to use cellular data.
-
Turn the toggle for Include Videos to ON.
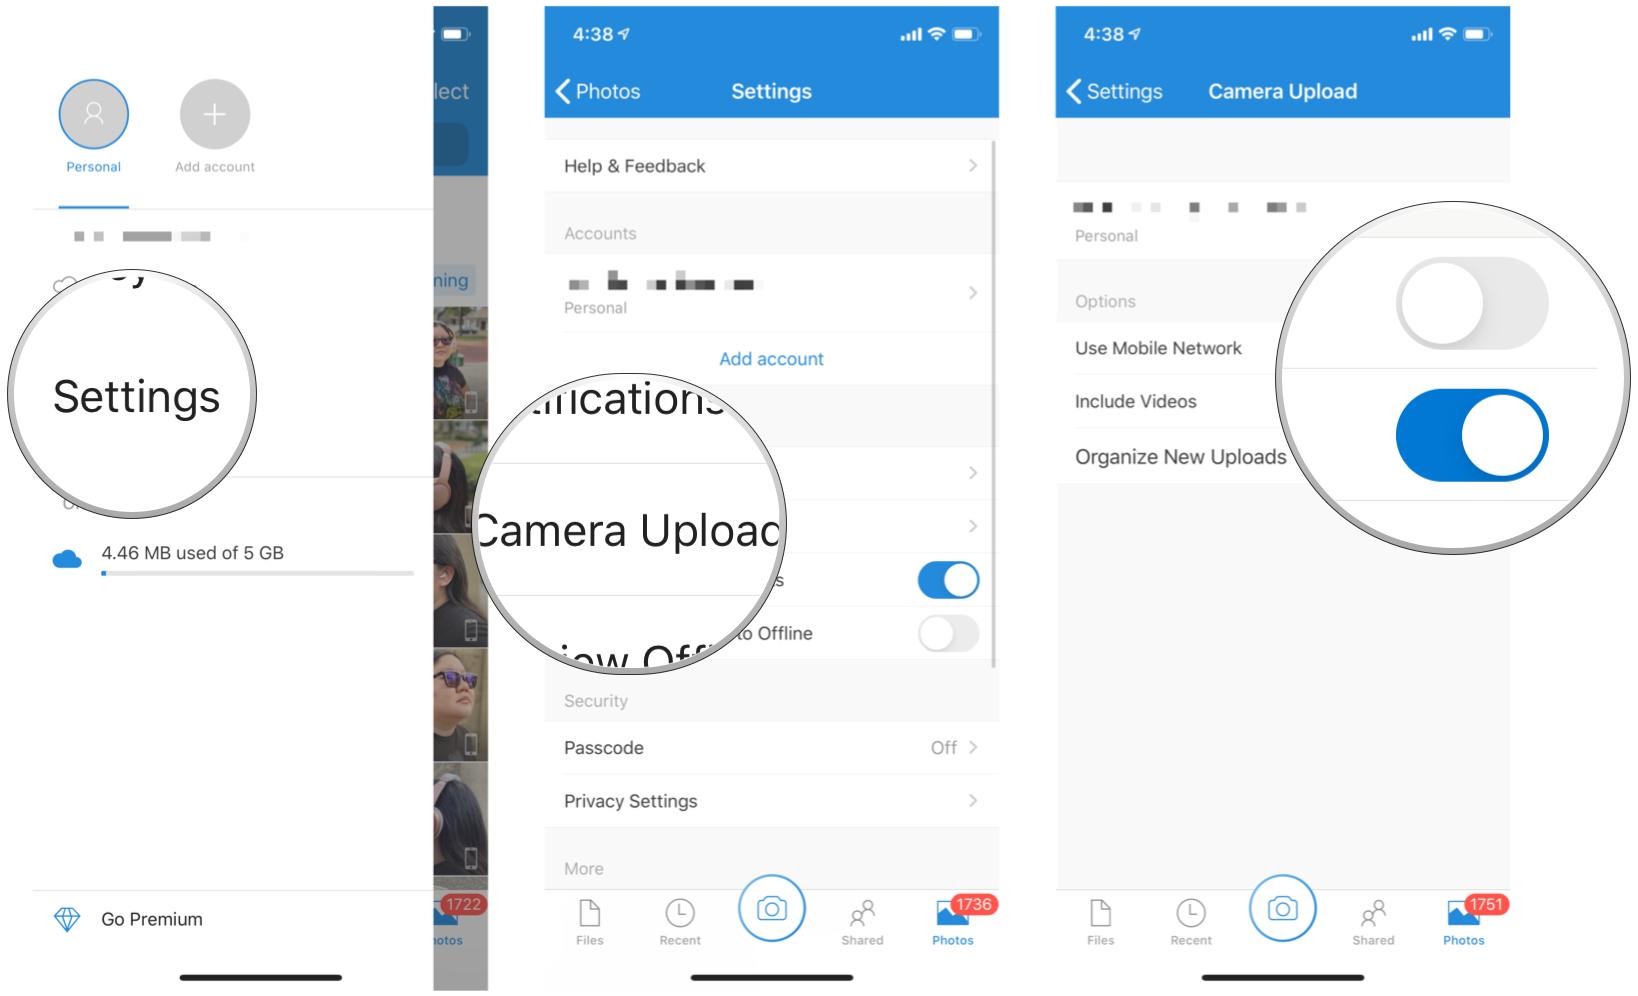
All of your photos and videos should be uploading to OneDrive now, and any new photos or videos will be uploaded the next time you launch the app.
Always have your media backed up
These days, it’s more important than ever to capture photographic or video evidence of any wrongdoing or just moments that are special to you. That’s why you should always have a method of iPhone photo backup available, and it’s well worth paying for one of these services. After all, it’s a small price to pay for things that can’t be replaced.
Updated February 2022: Updated for iOS 15 and latest versions of Dropbox, Amazon Photos, Google Photos, and Microsoft OneDrive.


